
Pangea Software, Inc.
Developing for Mac OS and iOS since 1987
HOW TO ADD 3DTV SUPPORT IN YOUR tvOS APP
When the Apple TV 4 launched we had five games available for sale, and all of them had 3DTV support: Air Wings, Bugdom 2, Nanosaur 2, Nucleus, and Otto Matic. The 3DTV support is not only a cool feature, but it actually makes certain games easier to play because the player can judge distances with greater accuracy. This makes things like aiming weapons and jumping on platforms much easier.
The Apple TV and tvOS do not inherently support 3DTV in that there are no tvOS API's for such a thing, and the AppleTV cannot send an HDMI signal to the TV to tell it when to switch to 3D or 2D like most movies do. Regardless, adding 3DTV support really is quite simple with any OpenGL application, and most modern 3D-capable TV's will auto-detect when the AppleTV is showing 3D content, and when it is not. The basic concept is simple: provide a left and right eye image in such a way that the 3DTV can combine them to form a stereo-3D image on the screen. The way we will do this is by using the Side-by-Side Method. In this scenario, the left-eye image is rendered to the left half of the screen, and the right-eye image is rendered to the right half like so:

This is an easy method to implement, but the downside is that you lose 50% of your horizontal resolution. In most games, however, this resolution loss is not very noticeable since things are moving around, and the stereo element adds more to the scene than the loss of resolution takes away.
Adding 3DTV support to an OpenGL game only takes a few minutes, and here is how it's done:
1. Eye Separation & Focal Length
	BOOL	g3DTVOn = YES;
  	float	g3DTV_FocalLength = 180.0;
   	float	g3DTV_EyeSeparation = 22.0;
There are only two variables that determine how the stereo image will appear: g3DTV_EyeSeparation and g3DTV_FocalLength. Eye Separation determines how far apart the "eyes" or cameras are from each other. The wider the separation the more "miniaturized" your scene will appear because as you widen the separation you're essentially making your head larger, thus the world you're viewing smaller. The Focal Length determines where the zero-plane is on the screen. That is to say the point in front of the camera which appears to be exactly on the TV screen's glass. Anything in front of that point will appear to be coming out of the TV, and anything in back will appear to be going into the TV.

Do not abuse the Eye Separation and Focal Length values because they can lead to eye strain and "cross-eyed" effects. It's fun to see things pop out of the screen at you, but don't do it all the time or it will mess you up. Additionally, having a wide eye separation enhances the 3D effect, but it too can cause eye strain. Sometimes less is more, so be careful when finalizing your 3D effect parameters.
1. Drawing the Scene
Your scene drawing function needs to draw each frame twice: once for the left eye, and once for the right eye. Here's a simplified example of what it should look like:
/******************* DRAW SCENE *********************/
	void DrawScene(void)
  	{
		Byte	pass = 0;

			 /* BACKUP ORIGINAL CAMERA COORDS */

		gMyCameraBackup = gMyCameraInfo;


	    	/* CLEAR BUFFERS */

 		glClear(GL_COLOR_BUFFER_BIT|GL_DEPTH_BUFFER_BIT);

	do_3dtv_pass:

			/* OFFSET CAMERA FOR 3DTV */

 		if (g3DTVOn)
			Calc3DTVCameraOffset(pass);		// adjust camera for left or right eye
/* SET CAMERA MATRIX */
 		SetCameraPlacementAndUpdateMatrices(pass);


			/* DRAW GEOMETRY */

		DrawMyGeometryHere();
		 /* DO NEXT 3DTV PASS */

		if (g3DTVOn)
		{
			if (pass == 0)
			{
				pass++;
				goto do_3dtv_pass;
			}
		}
			 /* SWAP THE BUFFERS */

		[gMyGLContext presentRenderbuffer:GL_RENDERBUFFER_OES];


			/* RESTORE THE CAMERA */

		gMyCameraInfo = gMyCameraBackup;
     }
This is obviously a simplified version of what a real draw function would look like, but it outlines the basic flow of drawing the scene twice. The two functions that do the real work are Calc3DTVCameraOffset() and SetCameraPlacementAndUpdateMatrices() which are described below:
2. Offset the Camera for Left & Right Eyeballs
	/******************** CALC 3DTV CAMERA OFFSET ***********************/
	//
	// Offsets the camera's location and point of interest left or right depending
	// on which eye we're rendering.
	//
	void Calc3DTVCameraOffset(short pass)
	{
		Vector3D	aim;
		Vector3D	xaxis;
		float		sep = g3DTV_EyeSeparation * 0.5;
 		const Vector3D up = {0,1,0};
 		if (pass > 0)				// move camera left or right for each eye
			sep = -sep;
 			/* CALC CAMERA'S X-AXIS */

		aim.x = gMyCameraBackup.pointOfInterest.x - gMyCameraBackup.cameraLocation.x;
		aim.y = gMyCameraBackup.pointOfInterest.y - gMyCameraBackup.cameraLocation.y;
		aim.z = gMyCameraBackup.pointOfInterest.z - gMyCameraBackup.cameraLocation.z;
		Vector3D_Normalize(&aim, &aim);
		Vector3D_Cross(&up, &aim, &xaxis);
			 /* OFFSET CAMERA'S FROM */

		gMyCameraInfo.cameraLocation.x = g3DTVCameraBackup.cameraLocation.x + (xaxis.x * sep);
		gMyCameraInfo.cameraLocation.z = g3DTVCameraBackup.cameraLocation.z + (xaxis.z * sep);

     		/* OFFSET CAMERA'S TO */

		gMyCameraInfo.pointOfInterest.x = g3DTVCameraBackup.pointOfInterest.x + (xaxis.x * sep);
		gMyCameraInfo.pointOfInterest.z = g3DTVCameraBackup.pointOfInterest.z + (xaxis.z * sep);
	}
Nothing fancy going on here either. This function calculates the camera's x-axis and then moves it right or left along that axis depending on whether we're rendering the left or right eye. Note, however, that we move both the cameraLocation and the pointOfInterest. You might think we would only want to move the cameraLocation and leave the pointOfInterest alone because that would simulate how a real eye works:

This, makes sense logically, but it creates two different rendering planes that are not parallael, so it results in distortion and eye strain. It ends up that the best solution is to keep the eyes parallel:

3. Set the Viewport & Frustum
You could just set the frustum to be the same as it would be for a regular, non-3D render, and that would work, but once again, the image would appear a bit distorted and cause some eye strain. The solution is to work some magic on it to create a modified, asymmetric frustum for each eye. Additionally, we need to remember that we're squeezing the left and right images into a single screen, so we have to scale our Viewport 50% horizontally:
/************** SET CAMERA PLACEMENT & UPDATE MATRICES **********************/
	void SetCameraPlacementAndUpdateMatrices(Byte pass)
	{
		int		w, h, i, x, y;
		float	aspect;
/* SET VIEWPORT */
 		GetCurrentViewport(&x, &y, &w, &h); // get the view's dimensions
 		aspect = w / h;		// calculate the aspect ratio
 		if (g3DTVOn)
		{
 			if (pass == 0)	// rendering the left or right eye?
				glViewport(x,y, w*.5, h); 	// squeeze width 50% width & put on left
			else
				glViewport(x + (w * .5),y, w*.5, h); // put on right
		}
		else
			glViewport(x,y, w, h);


 			/* INIT PROJECTION MATRIX */

		glMatrixMode(GL_PROJECTION);
		glLoadIdentity();
			/* SETUP FRUSTUM FOR STEREO 3D CAMERA */

		if (g3DTVOn)
		{
			float	left, right;
			float	halfFOV = gMyCameraInfo.fov * 0.5f;
			float	near 	= gMyCameraInfo.hither;
			float	wd2     = near * tan(halfFOV);
			float	ndfl    = near / g3DTV_Focallength;

			if (pass == 0)
			{
				left  = -aspect * wd2 + 0.5 * g3DTV_EyeSeparation * ndfl;
				right =  aspect * wd2 + 0.5 * g3DTV_EyeSeparation * ndfl;
			}
			else
			{
				left  = -aspect * wd2 - 0.5 * g3DTV_EyeSeparation * ndfl;
				right =  aspect * wd2 - 0.5 * g3DTV_EyeSeparation * ndfl;
			}

			glFrustumf(left, right, -wd2, wd2, gMyCameraInfo.hither, gMyCameraInfo.yon);
		}


				/* SETUP FRUSTUM FOR STANDARD PERSPECTIVE CAMERA */

		else
		{
			gluPerspective(RadToDegrees(gMyCameraInfo.fov), aspect, gMyCameraInfo.hither,
							 gMyCameraInfo.yon);
		}


     		/* INIT MODELVIEW MATRIX */

		glMatrixMode(GL_MODELVIEW);
		glLoadIdentity();
		gluLookAt(gMyCameraInfo.cameraLocation.x,
					gMyCameraInfo.cameraLocation.y,
					gMyCameraInfo.cameraLocation.z,
					gMyCameraInfo.pointOfInterest.x,
					gMyCameraInfo.pointOfInterest.y,
					gMyCameraInfo.pointOfInterest.z,
					gMyCameraInfo.upVector.x,
					gMyCameraInfo.upVector.y,
					gMyCameraInfo.upVector.z);
	}
I won't bore you with the details of what the math above is doing to the frustum, but if you want a more detailed explanation then I would recommend reading the information on Paul Bourke's site.
4. Make the TV see your 3D content
Most 3DTV's (if not all) have an auto-detect mode. Sony 3DTV's actually have two different Auto-Detect modes. Mode 1 looks for a 3D signal over HDMI which indicates that the content is 3D. The Apple TV does not support this, so that auto mode will not work. Auto 2, however, lets you tell the Sony to look for Side-by-Side 3D content:

With Auto 2 selected the TV "should" automaticaly enter and leave 3D mode when appropriate. However, there is one important thing to keep in mind: the auto-detect isn't perfect, so you should help it out as much as you can. Say, for example your game brings up a UIKit dialog for your Pause screen. Well, if it's a rectangle in the middle of the screen the Auto Detector might not be able to recognize it as 2D content. It may look like side-by-side content. So, what you need to do is always bring up asymmetrical images when you want the TV to drop back into 2D mode automatically.
For example take a look at the Bugdom 2 Pause screen:
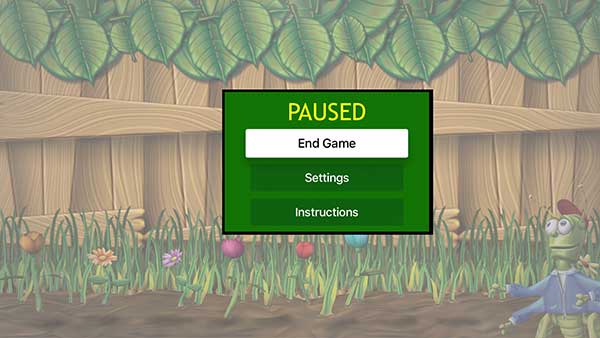
This screen is very symmetrical, and when we first put it into the game the TV did not recognize it as 2D content. In order to force the TV into recognizing this as 2D we put that image of Skip the Grasshopper in the bottom-right corner. That was enough asymmetry that the TV was able to auto-detect this as not being 3D content, so now the TV drops into 2D mode automatically whenever the pause dialog appears.
Similarly, if your 3D content is too complex in appearance the TV may have a hard time determining that it is 3D content, so you may have to manually put the TV into 3D mode. Some of our games switch extremely well in Auto mode, but some do not. If you play your cards right you can design your app such that a 3DTV will automatically enter and exit 3D mode as your game enters and exits 3D mode. The user shouldn't have to do a thing.
5. Help us Help You!
If you find the above code useful all we ask is that you help support us by downloading one of our tvOS or iOS apps. If you want to see examples of the 3DTV feature in action then check out these games. Getting any of them on iOS automatically gives them to you on tvOS for free:
 |
 |
|
 |